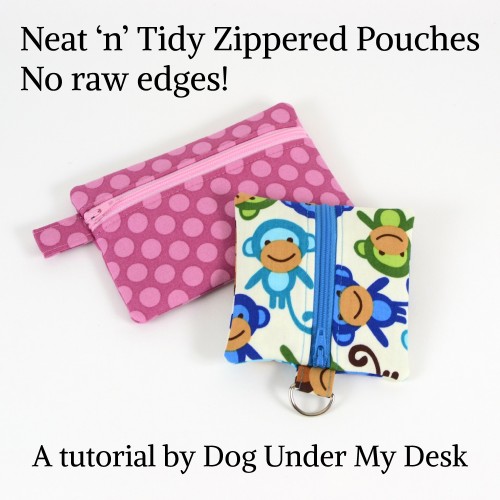
Thank my friend Erin for the cute name. No-raw-edge-pouch was just too dreadful. She also told me to go to bed, so of course this is what I did instead. I get 3 hours of sleep but but you all get a new tutorial. Yay?
You all know how much I hate raw edges in bags when they aren’t necessary, however if you’re just making quick makeup bags or coin pouches, I still say you can’t go wrong with how quickly the Easy Zippy Pouches go together. That said, these are pretty quick and easy to make too. I will simply give you both options and let you choose!
Enough chatting. Tutorial time!
Figuring out what size to cut for this one is simple. Decide on your finished pouch size and add 3/4″ to the height and 3/4″ to the width. Or just add a full inch because it really doesn’t matter and I know some of you hate math. :)
The square pouch is 4″ square finished and I cut the pieces to 4.75″ square (charm pack anyone?) and just used fusible interfacing (Pellon SF 101) on the main fabric so that I could show you the details of how to construct it. The rectangular pouch is 5.75″ wide x 3.75″ tall and I cut the pieces to 6.5″ wide by 4.5″ tall. I kept the fusible and added batting to the rectangular one (super thin Quilter’s Dream “Request”, their thinnest cotton batting) and I really like it. I’m going to show you the square one but then I’ll explain what you’ll do differently for a rectangle.
(OK so how cute are those monkeys?)
This is a quick and dirty tutorial. I’m not going to go into super-specifics about how to fold tabs into fourths and trim interfacing away from seams. Again, three hours of sleep… Refer to the Circle Zip Earbud Pouch if you have any concerns about those sorts of things, since it’s a bit more in depth. What really matters is how to sew around part way, then separate the lining from the main fabric and sew them separately.
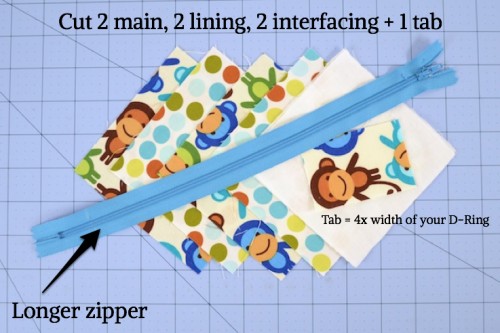
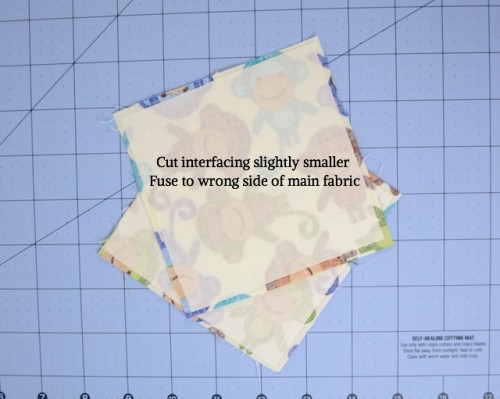
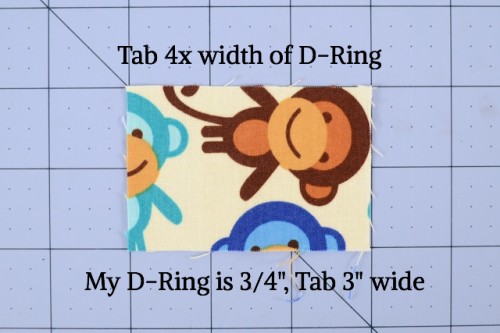
Cut two squares from both your main fabric and lining. Then cut 2 smaller squares from interfacing (I cut mine about 1/4 smaller so they still catch in the stitching but don’t add extra bulk to the seams.) Also cut a 2″ long D-Ring or pull tab. It should be 4 times the width of your D-Ring if you’re using one. You’ll also need a zipper that’s longer than the width of your fabric.
Fuse interfacing to the wrong side of the main fabric.
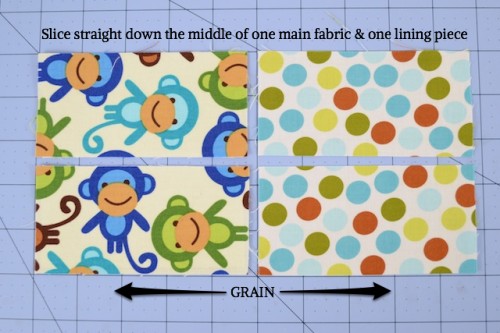
Take ONE EACH main fabric and lining piece and cut them where you want to insert your zipper. I decided to cut mine right down the middle. I cut them with the grain because it helps with stability while inserting the zipper. It’s not a huge deal if you don’t.
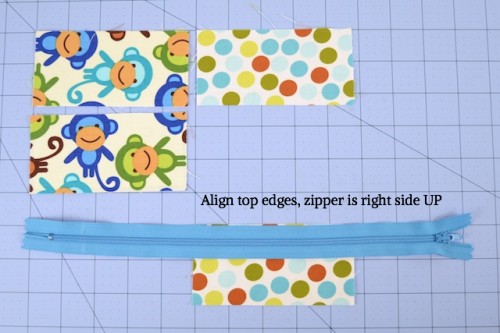
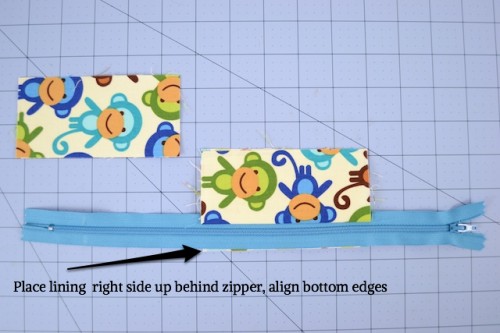
Place one of the lining pieces face up and place the zipper (also face up) on top, aligning the edges.
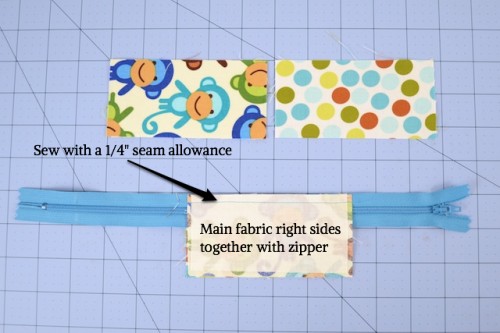
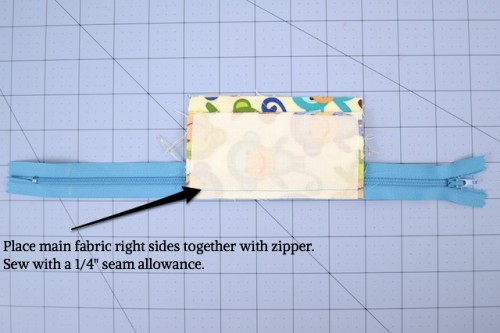
Then flip the main fabric piece over and align the same edge. Install your zipper foot and sew with a 1/4″ seam allowance (SA). Try to keep the pieces in the correct order if you are using a directional fabric or you want the design to line up when you’re done like mine does.
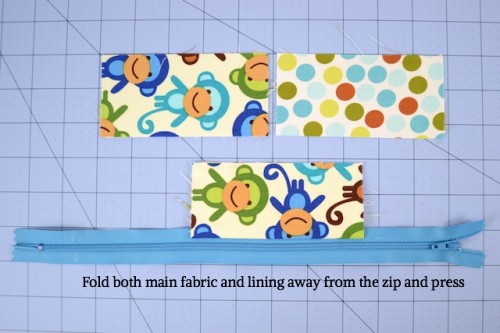
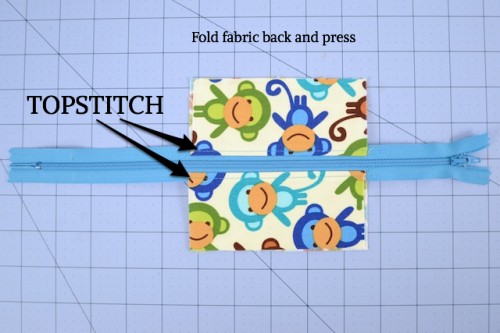
Fold both pieces of fabric back and gently press, carefully so you don’t melt the zipper. Don’t topstitch yet.
Place the 2nd lining piece face up and align the bottom edge of the zipper, also face up. Make sure you match the sides of the top fabric pieces too so everything is lined up when you’re done.
Add the last main fabric piece face down, aligning the bottom edge. Sew with a 1/4″ seam allowance.
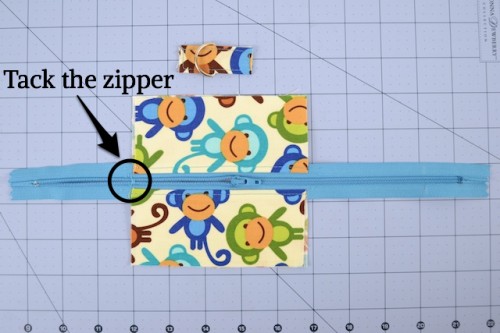
Fold those pieces back and again, gently press. Now increase your stitch length (3.5 is good) and topstitch 1/8″ away from the edge of the fabric.
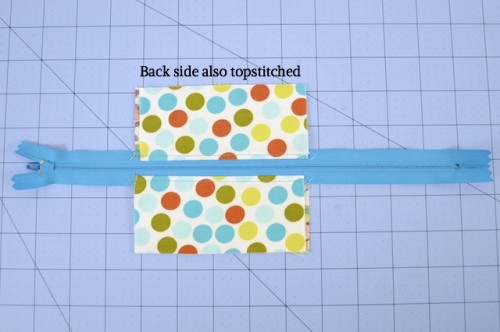
The back side should look like this.
Make the tab. I used a 3/4″ D-Ring so my tab was 3″ wide by 2″ tall. If you don’t have a D-Ring, I would go with 3″ long x 3″ wide for a pull tab. If you want to make a smaller pouch with a split ring instead of a D-ring, 2″ or 2.5″ wide would probably be better.
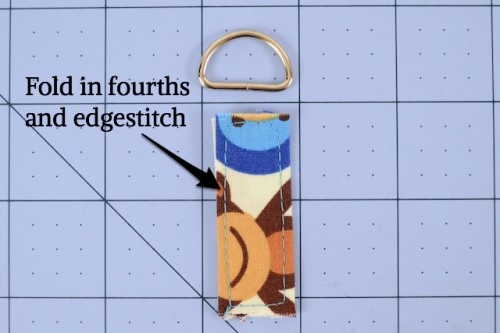
Fold the tab in fourths: Fold it in half, press. Open it back up, fold the raw edges to the center, press. Fold that in half. Press. Edgestitch!
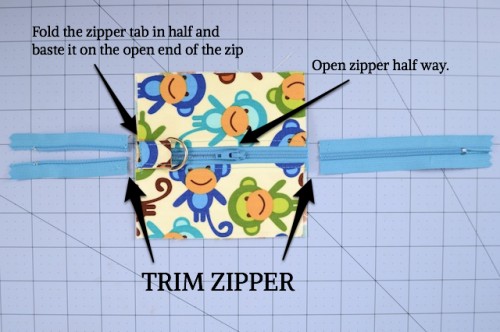
UNZIP THE ZIPPER HALF WAY and use a wide zig zag stitch to tack the open end of the zipper together. This helps hold the shape of the pouch while you can’t see what you’re doing.
Add the D-ring to the folded tab, place the raw edges at the edge of the pouch and baste the tab 1/8″ from the edge.
Trim the zipper off on both ends (don’t use your good scissors for this!) Set this piece aside.
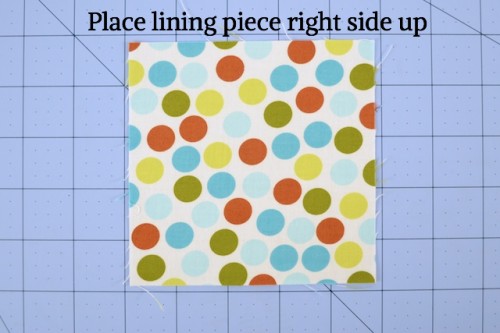
Now you get to assemble the pouch! Place the lining piece face up.
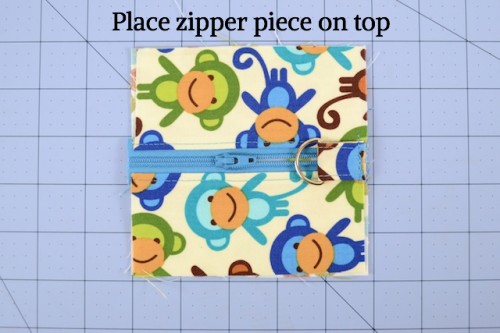
Place the zipper piece on top of that, aligning the edges.
READY FOR THE TRICK? :D
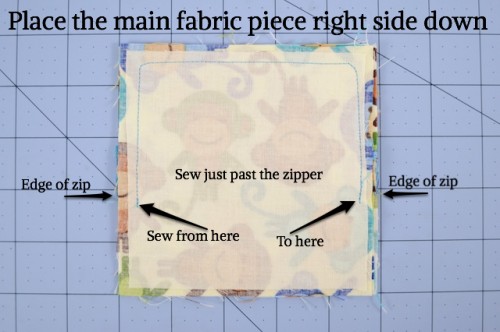
Add the last main fabric piece on top of that, again matching the edges. Sew around the top, using a 3/8″ seam allowance. Start 2-3 stitches before the edge of the zipper tape (be sure to backstitch too!) and sew around to 2-3 stitches past the zipper tape on the other side.
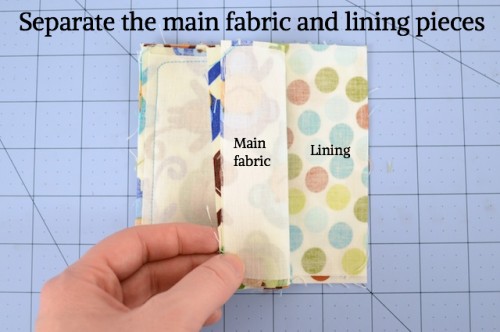
Pull unstitched part of the main fabric pieces together and the lining pieces together.
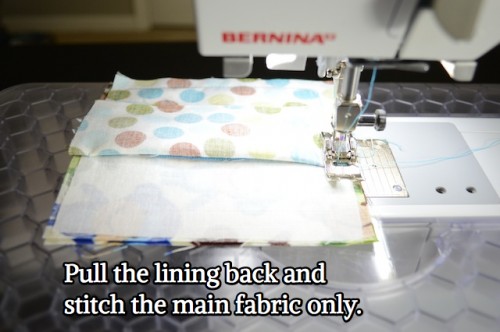
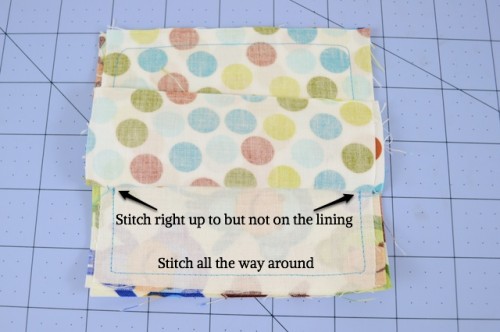
Keeping the lining folded back as far as possible, use the exact same seam allowance and stitch RIGHT UP TO the first set of stitches but do not sew into the lining. Make sure you backstitch at the beginning and end. Sometimes it helps to start 2-3 stitches past, put your needle down and backstitch those 2-3 stitches, then sew forward again. If you have a gap of a stitch or two, it’s OK.
It should look like this. The lining is still pulled back and the main fabric is sewn.
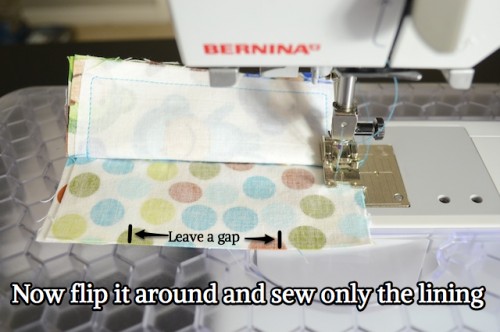
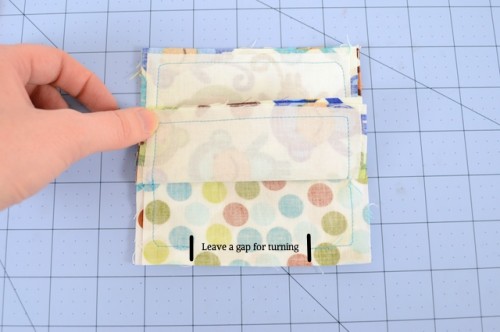
Now FLIP it over and fold the main fabric back. Do the same thing but leave a gap for turning. Backstitch at the beginning of the stitches and before the gap. It’s more important in this step to not catch any of the main fabric in the stitches, so if you need to leave a stitch length gap it will be OK.
Do not forget to leave an opening for turning!
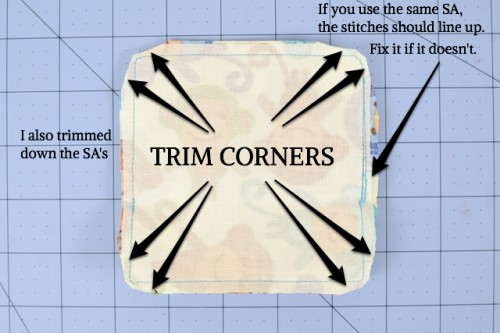
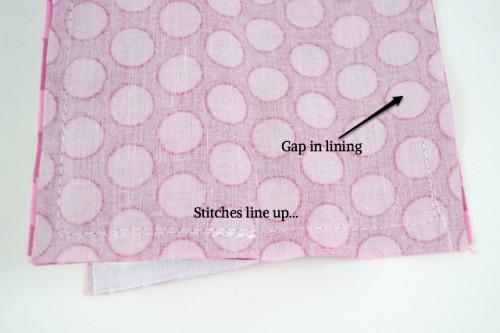
Trim the heck out of this thing. Trim the corners and trim the seam allowances down to 1/4″. Make sure all your stitches line up before turning.
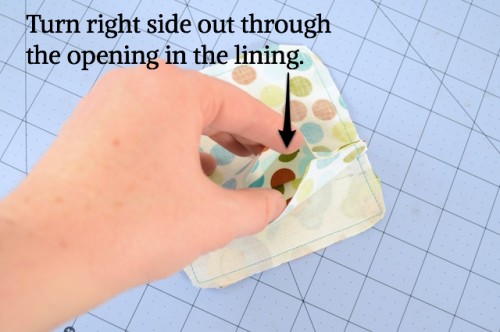
Reach into the opening and carefully turn it right side out!
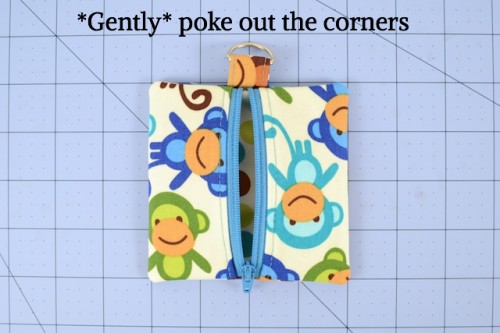
Gently poke out the corners and make sure everything looks good. My tab is a little bit off. I made this pouch to hold dog treats and cleanup bags on the dog leash. I think it will be OK.
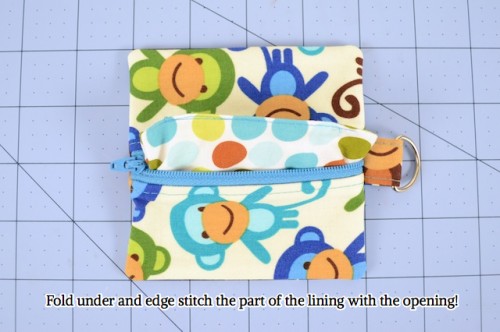
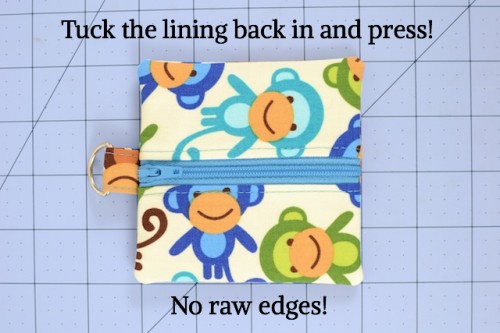
Now you just need to pull out the opening in the lining and tuck under the edges and edge stitch, just like you would in any purse/bag. I thought it might be difficult in this tiny one, but it was fine.
Tuck that back in and press it really well. That’s it! I think that was pretty easy, don’t you?
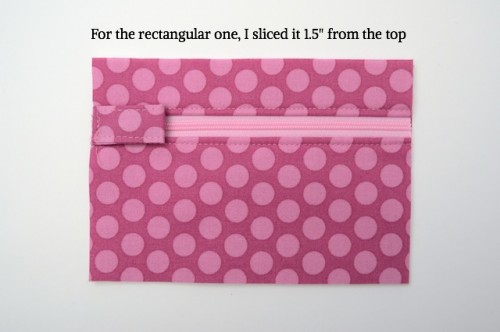
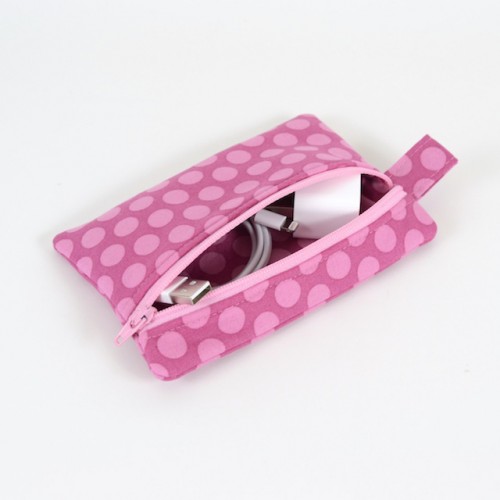
So I made it more difficult, of course! I needed a pouch to hold my new iPhone lightning cable. I cut this one 6.5″ wide by 4.5″ tall. The finished size is 5.75″ wide x 3.75″ tall. I sliced one lining and one main fabric piece 1.5″ down from the top. If you’re making a larger pouch, you may want to add 1/4″ to that. Smaller pouch maybe subtract 1/4″? This worked pretty well. I installed the zipper the same way and just added a pull tab instead of a D-Ring since this one doesn’t need a strap and isn’t going on a keychain.
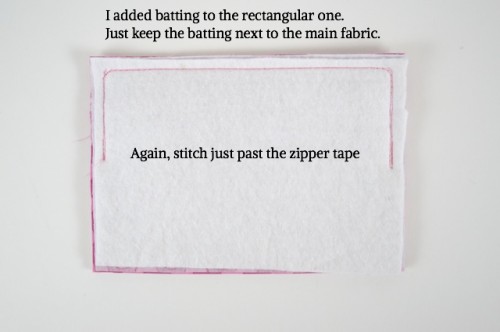
I like the look of the slightly padded pouch, so I added a layer of Quilter’s Dream *super thin* cotton batting to the front and back. Warm & Natural is thicker than this but would probably be OK. The lightweight poly Pellon 988 would probably be OK too. You could fusible fleece it, but don’t blame me if it wrinkles… plus I like trimming batting from seams.
Now on this one, you don’t need to go down as far, again stitch just past the zipper tape. Don’t forget to backstitch.
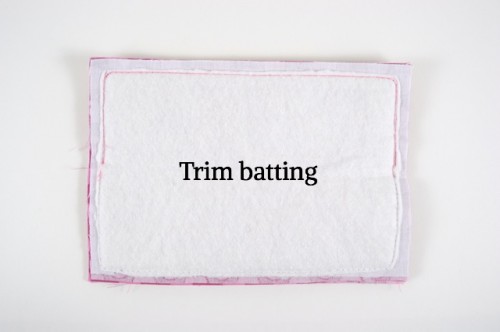
When you sew the main fabric and lining separately, just sew the batting to the main fabric. Trim the batting from the seams.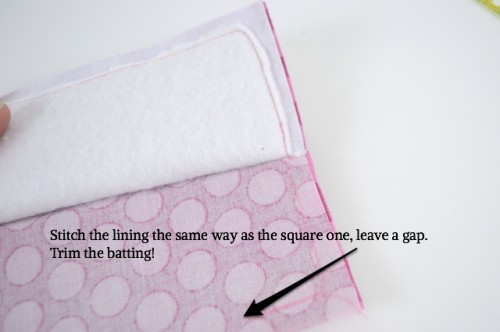
Sorry these stitches didn’t really show up but you can enlarge the photo.
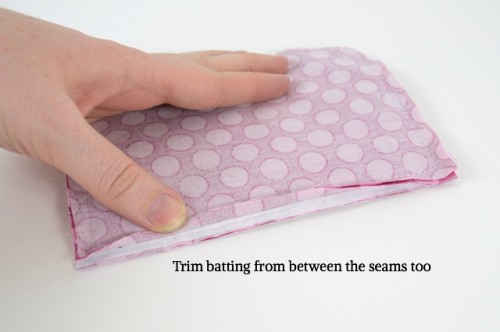
Re-emphasizing the most important step. TRIM. There just isn’t enough room with all those extra seams for any bulk.
Also trim it from the top seam that’s all sandwiched together.

this is awesome – I made one this past weekend for my ipod – I love it!!
Thank you, Erin! I will be trying one (or more) very soon! :)
Just finished two wristlets and loved it the second tome. Will try this zippered one soon. Thanks for the new tuto, i was doing those the old way you showed earlier. ;-)
I really need to schedule some days off from work so I can make a few of these as well as some of your other patterns! I love your tutorials!
Thank you so much for all your tutorials they are great! My daughter has had me purchase a couple of your patterns already, now to find the time and clean space from the builders to get down and enjoy my new machine.
Keep them coming! I wish I could be as clever!!
If you need a tester, I am in Bristol, England where we do not always get the items you mention, I would be willing to give it a go.
Thanks for the great inspiration!!!
Happy Sewing,
Vickie
[…] Love cute little zippered pouches, but hate ‘messy’ linings? Learn how to make one free from raw edges with this Neat ‘n’ Tidy Zippered Pouch tutorial. […]
Hey Erin,
I’m teaching my 9 year old Jessica to sew. I think this would be a great project for her! Hopefully, this weekend, we’ll get started!!!!
Ellen
[…] favorite Michelle Pattern grocery bags to help keep things in my suitcase organized. Then my pink zippy pouch ended up being the perfect size to hold my camera, which was great because I didn’t have time […]
I just got done making the square version! Yay, it’s so cute and your tutorial was great! :c )
Thank you :)
I just wanted to thank you for your fabulous tutorial, the detail made it so simple I think I can finish my quota by tomorrow. I altered the idea a little for a wet bag pattern for diapers, I can not thank you enough for sharing.
Love this tutorial. Made this bag for my daughter from a cute Japanese hedgehog print. It turned out so cute and she loves it. Great tutorial!
[…] are EPIC” laptop sleeve. Smaller pouch is made with my no-raw-edge tutorial here. I didn’t have a longer zipper, so I ended up putting the zipper on the short end. Which […]
hello:)
I was wondering if this tutorial can be used to make things to sell?
It is the best tute I have seen for no mess zip pouches :)
Too much fun!!! Guess what everyone will be getting for Christmas this year !!! I might make a bit bigger for my college age daughter and friends for a makeup bag. THANKS !!!
Your directions are very user friendly too.
THANKYOU!!!!!! This tutorial is exactly what I needed. After much searching for a way to do this, with a lining, without raw edges, I finally found this! I knew there must be a trick to it, I just couldn’t work it out in my own. I have an aversion to raw edges and it peeved me no end to only find tutorials with raw edges on the inside… you have save my sanity!
There is always a trick! That’s what I sit over here figuring out. :)
oh my gosh! This is so nice. It is definitely named correctly. So neat and tidy!
You missed one step at the end. turn it inside out, sew the gap in the lining, then turn it inside out again through the zipper.
I figured it out though. i have also made your earphone case a number of times but I like the extra step of this one making it….neat and tidy!! Thanks.
This is so clever, I Love It !!!
I have been making pouches using French Seams, but I wasn’t happy with that, I will definitely be giving this a try before the day is over.
Thank You so much for sharing.
I love this pattern and tutorial! It came together very quickly and looks very cute. Thank you for sharing it!
I have one problem. The edges where I cut off the zipper are hard and make the pouch stick out a little, especially on the side without the tab. Is there any way to minimize this?
Hi, I’m so glad I found this, making kids pencil cases for charity and the inside is not great even with overcasting, i should ahem figured this out but didn’t! thanks
I had so much fun making these! I made six today to hold gift cards and candy as Christmas gifts for my kids’ teachers. I wound up cutting the fabric above the zipper to be 3/4″ inch when finished and squared the bottom corners so they stand up on their own. TOO CUTE!!! Thanks so much for the great idea and fabulous instructions!!!
I love your tutorials and I just made your circular earbud pouch. I can’t find the pattern for the easy zippy pouches. Can you tell me the measurements (for the cloth) that you used to make the square version? Thank you!
Nvm, I figured it out. Thank you for the wonderful tutorial!
Nvm, I figured it out. Thank you for the wonderful tutorial!
This pattern is awful – not really clear about each step. I am NOT a new sewer. I have been sewing clothing and many crafts for over 60 years! I have ripped out and re-sewn this pattern multiple times without success. I give up!!!
I have made several pouches, bags & purses recently from other websites and have never had this kind of trouble.
That the least, this pattern could use a video along with your written instructions ( it could possibly clear up some of the confusion).
My suggestion is not to skip over any steps- don’t assume the sewer knows what you do next.