
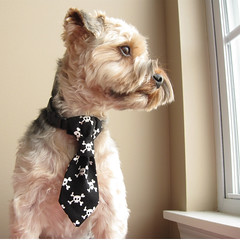
I made Loki a new tie for Halloween last week. Loki doesn’t really enjoy wearing clothes unless it’s very cold out, so I started making these ties for him for holiday pictures. I made a tutorial in case you have a little guy at home who needs a tie too!
This is for Susan, who wrote to me asking about little dogs with thinner collars and other sizes.
Hi Susan!
For a thinner collar I would simply make the back sleeve piece a little shorter (still 3″ wide, but maybe only 2.5 or 2.75″ tall.) OR you could simply place the tie wrap higher and hand stitch it into place so it doesn’t slip down. Loki’s collar (shown) is only 1/2″ wide, and most tiny collars are 3/8″ wide. So really, it should be fine, especially if you make the tie a little smaller!
For a smaller dog, I would reduce the scale of the pattern when you print it. Maybe start at 80% and start there.
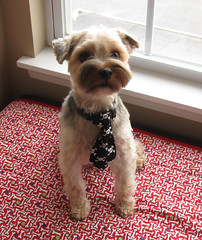
Unfortunately, my only models are 6 & 12 pounds, and the only big dogs I know would be too embarrassed to wear a tie :) My experience is that dogs who aren’t dressed on a regular basis do not put up with it for very long. If it would be just for a picture, you could maybe figure out how tall the dog is from neck to shoulders and maybe figure 1/2 to 1/3 of that. Loki is about 12″ tall and the tie is about 6″ long. Just figure out the length you want and print it at a larger scale or enlarge it on a copy machine.
So if the tie is 6.5″ long, and you want it to be 9″ long, then enlarge it about 140%.
I hope that helps!
Erin
I tried to download the PDF file but keep getting error messages.
I have a Westie which I would love to make this tie for.
Could you email me the directions.
Thank you.
Gail
Hi Erin,
Thank you so much for the advice, I will give it a try!
Also, do you have other tutorials on making bow ties, tuxedo bow ties, and neck ties with pointed collars? I’m really interested in learning how to make those for little boy doggies. If so, please let me know!
Thank you!
http://www.MySpoiledDoggie.com
Just found your blog, VERY CUTE TUTORIAL!!! I have a big black lab who puts up with everything and he will be getting one of these soon! :) This is my dog blog https://dogfriendlydelmarva.blogspot.com/ , but I have a crafting one in the works!
Thank you Leanne! Please let me know when you have a crafting blog up! I feel surrounded by crafters with kids and it is nice to find people who share the uncontrollable urge to sew for their dogs :)
[…] HOPE YOU ALL HAD A GREAT WEEK! I FINALLY STARTED SEWING AGAIN. I CAME ACROSS THIS CUTE LITTLE TIE TUTORIAL. I WANTED TO MAKE SOMETHING EASY BECAUSE IT’S ONLY DAY 2 WITHOUT MY […]
Thank you, thank you, thank you – finally something for my husband for his guy dog! I’ll make one this weekend. I also love your halter pattern for “my” little girl yorkie. (You were on my craft gossip e-mail.)
I’m so glad everyone is finding me so they can make use of this! Sometimes I feel like I am talking to myself on here. I love that you have a little girl Yorkie and your husband has a “guy” dog. Believe it or not, our dogs are the opposite. Loki has always clung to me – he is the dog under my desk, and Sammy loves my husband. It’s so funny how it worked out!
Please send me a link to a picture when you are all done!!
Thank you for the tutorial, I really loved making this and wish I had a little puppy to wear this! Made one for my Mom’s puppy Milo to wear on her birthday!
Hi Erin,
Thank you so much for the pattern and steps. I almost died when I saw your dog in that tie, the cutest thing ever. I ended up making like 6 ties in one day (overboard) but have given them away to my other dog lovers.
Again, thank you from Toronto, Canada
Thanks sooooo much for the seat belt pattern! My yorkie will love it. Cant wait to go make it! THANKS AGAIN!
Thank you so much for the tutorial! i look forward to making them!
These are sew adorable!! Cant wait to make one for my little mutt! :)
Thank you for this tutorial. I enlarged the pattern slightly (my daughter’s dog is much larger), & it turned our so cute. It was super easy to follow also, very nicely written.
Thanks everyone! I’m so glad you’re having fun with it!
Question making the tie but a little confusing for me #6. I made the tie but had to do it another way. It looks like #5 I am stitching 3/8″ around not sure how you are doing that. Are the tie part bottom part sewn together so you only have one tie versus two? Can you show #6 a little clearer.
Hi! Thanks for the question. I’m not sure what you mean by one tie versus two?
You fold the tie in half, right sides together, matching the pointy ends and sew the two halves together. You stop sewing when you get to the finished part at the top of the tie, then turn the whole thing right sides out through the little hole in the top.
I hope that helps!
[…] of Dog Under My Desk shared her tutorial on how to make these super adorable dog ties on her blog. Super simple to make and you can pick and choose the fabric you want to use!Image: Dog Under My […]
Hi!
These are adorable! I’d like to make some for a charity event that’s in a few days, Run for the Rescues 5k (in Maryland). They would either be Raffles off or put in a silent auction. All proceeds go to Dogs XL rescue. I don’t want to do that without your permission first though. Would you mind?
Thanks!
[…] for Mother’s Day Brunch? Erin makes it super easy with her awesome tutorial! Check out the free tutorial here and get […]
I love the skull fabric used in one of the ties. Do you know the manufacturer?
It’s Riley Blake Boo to You – but I’m pretty sure it’s out of print. I found it in orange and black by searching Riley Black Halloween Skulls. Hope that helps!
[…] https://dogundermydesk.com/2010/11/little-dog-tie-tutorial/ Dogs Ties […]
Thank you so much for this great tutorial. Hopefully I can get around to making a few of these soon!
Hi Erin!
Great Blog! I want to thank you for sharing this amazing tutorial!! I just wrote a post about the doggie ties I made a shared a link to your website. Just in case you want to check it out:
https://applesandsawdust.wordpress.com/?p=166&preview=true
Thanks again! Keep it up :)
OMG Koda is adorable! Thank you for sharing!
Thanks for posting the link for the PDF – I’ve had trouble finding it. Your dogs are cute!!!
Your doggie tie is just precious!!! I may make some of them for the local animal shelter…maybe the cuteness will help them to get the dogs adopted. Thanks for the tutorial!
Hi thanks for sharing. I can’t wait to make some for my puppy. I don’t see the measurements for the main part of the tie. Could you please email to me. Thanks again, these are adorable!!!
I wanted to thank you so very much for sharing your pattern. I have a craft show coming up next month and am making your ties to help our local shelter. There are a few tie patterns out there but they are not as simple or as quick as yours. We also have a rat terrier and they fit him perfectly! Thanks again, Melissa :)
[…] You can get the PDF file and free tutorial from the link https://www.dogundermydesk.com/2010/11/little-dog-tie-tutorial/ […]
Nice informative post Floral dog collar